
When I moved from configuring Cisco Meraki networks manually through the GUI dashboard to automating deployments with the Meraki API, the very first wall I hit wasn’t authentication or rate limits — it was simply knowing which organization and network I was actually talking to. Before you can clone a site, push firewall rules, or provision hardware programmatically, you need two identifiers locked in: your Meraki Organization ID and your Meraki Network ID.
In this guide I’ll walk through enabling API access, generating your API key, and then pulling both IDs three different ways — via Postman, via Python, and directly from the Dashboard UI without touching the API at all. I use all three depending on whether I’m scripting something or just need an ID fast during a troubleshooting call.
Step 1: Enable API Access in the Meraki Dashboard
API access is disabled by default on every Meraki org as a security baseline. You have to explicitly turn it on before any external tool — Postman, Python, Terraform, whatever — can talk to your organization.
- Log in to your Cisco Meraki Dashboard.
- Navigate to Organization > Settings (sometimes labeled Configuration settings depending on your dashboard version).
- Scroll down to the Dashboard API access section.
- Check the box for Enable API access.
- Save your changes at the bottom of the page.
If this box is unchecked, every API call you make later will fail with an authorization error, regardless of how correct your API key or headers are — I’ve burned time debugging “bad” scripts before realizing this toggle was simply off.
Step 2: Generate Your Meraki API Key
Your API key is functionally your admin password for programmatic access. Treat it accordingly.
- Click your user profile icon in the top-right corner of the dashboard.
- Select My profile.
- Scroll to the API access section.
- Click Generate new API key.
- Copy the key immediately and store it in a password manager. Once you close that window, Meraki will not show you the full key again — you’ll have to revoke and regenerate if you lose it.
Step 3: Set Up Your API Headers
Every request to the Meraki API — whether from Postman or a Python script — needs the same three headers:
| Header | Value |
X-Cisco-Meraki-API-Key | <Your_Generated_API_Key> |
Content-Type | application/json |
Accept | application/json |
Miss the X-Cisco-Meraki-API-Key header and you’ll get a 401. Miss Content-Type and some endpoints will silently reject malformed payloads.
Step 4: Get Your Meraki Organization ID
You have three ways to get this. Which one I use depends entirely on context.
Method A: Using Postman
- Open Postman and create a new GET request.
- Enter the URL:
https://api.meraki.com/api/v1/organizations - Under the Headers tab, add
X-Cisco-Meraki-API-Keywith your key as the value, andContent-Typeset toapplication/json. - Click Send. The response body returns a JSON array of every organization you have access to, each with a
nameandidfield. Save theidstring for the org you need.
Method B: Using Python
For anything I’m going to run more than once, I skip Postman and go straight to a script:
import requests
import json

# Define the Meraki endpoint URL for Organizations

url = "https://api.meraki.com/api/v1/organizations"

# Set up the required headers for authentication and data format

headers = {
    "X-Cisco-Meraki-API-Key": "YOUR_API_KEY_HERE",
    "Content-Type": "application/json",
    "Accept": "application/json"
}

# Execute the GET request

response = requests.get(url, headers=headers)

# Parse the JSON response

organizations = response.json()

# Print the output nicely formatted

print(json.dumps(organizations, indent=4))
Run this and look for the id field next to the organization name you’re targeting — that’s your Organization ID.
Method C: Directly in the Dashboard (No API Call Needed)
This is the fastest option if you’re not scripting anything yet and just need the number.
- Log in to the Meraki Dashboard and make sure you’re viewing an organization (not a specific network).
- Scroll all the way to the bottom of any page. In the footer, you’ll see a line similar to: “Data for [Your Org Name] (organization ID: XXXXXXXXXXXXXXXXXX) is hosted in [Region].”
Here’s what that footer actually looks like — I grabbed this from a Meraki demo org while writing this guide:
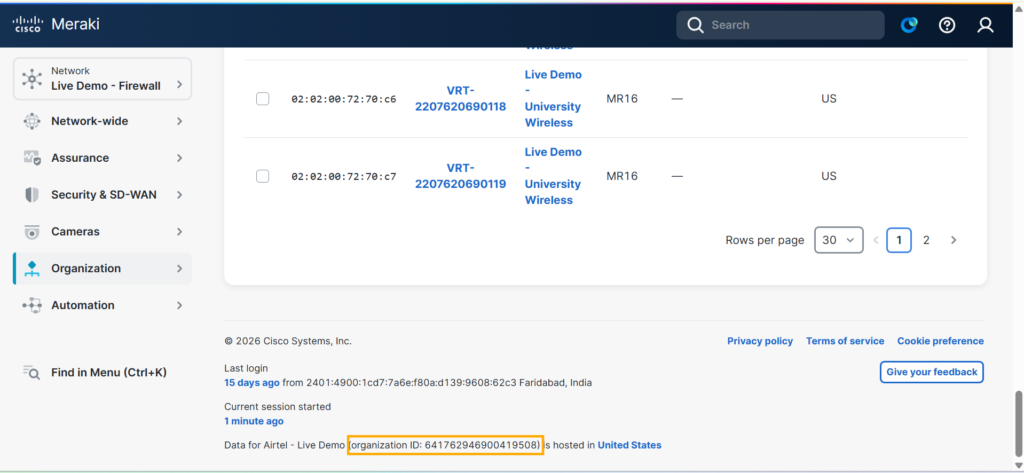
The organization ID sits right there in parentheses next to the org name, with the hosting region shown at the end of the line. No API key, no Postman collection, no script — just scroll and read.
- Alternatively, you can hit
https://api.meraki.com/api/v1/organizationsdirectly in your browser while logged into the dashboard, and it will render the same JSON array Postman would return.
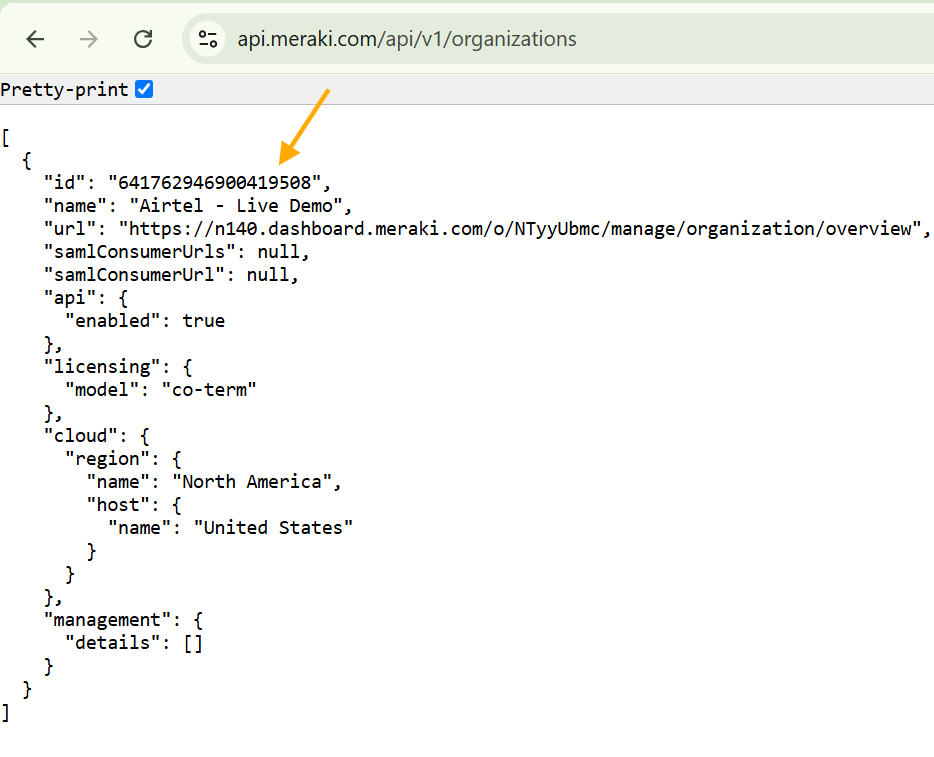
I use this dashboard footer method constantly when I’m on a call with someone and just need to confirm which org we’re troubleshooting in — it’s faster than opening Postman.
Step 5: Get Your Meraki Network ID
Once you have the Organization ID, you can list every network under it — branches, teleworker VPNs, HQ, whatever you’ve built.
Method A: Using Postman
- Create a new GET request.
- Enter the URL:
https://api.meraki.com/api/v1/organizations/{organizationId}/networks, replacing{organizationId}with the ID from Step 4. - Set the same headers as before.
- Click Send. You’ll get a JSON list of every network, each with a
name(like “Branch 1” or “HQ Wireless”) and its ownid.
Method B: Using Python
import requests
import json

# Replace with your actual Organization ID from Step 4

org_id = "YOUR_ORG_ID_HERE"

# Define the endpoint URL dynamically using an f-string

url = f"https://api.meraki.com/api/v1/organizations/{org_id}/networks"

# Set up the required headers

headers = {
    "X-Cisco-Meraki-API-Key": "YOUR_API_KEY_HERE",
    "Content-Type": "application/json",
    "Accept": "application/json"
}

# Execute the GET request

response = requests.get(url, headers=headers)

# Parse and format the JSON response

networks = response.json()

# Print the output

print(json.dumps(networks, indent=4))
Scroll the output for the network name you’re targeting, and grab the matching id.
Method C: Directly from the Dashboard URL
This is the one I reach for most often, honestly, because it requires zero tooling.
- In the Dashboard, click into the specific network you’re interested in — go to Network-wide, Security & SD-WAN, or any network-level page.
- Look at your browser’s address bar. The URL will follow a pattern like:
https://dashboard.meraki.com/network/N_1234567890/manage/... - The segment right after
/network/— in this example,N_1234567890— is your Network ID. It always starts withN_(orL_for some legacy network types).
No API call, no headers, no waiting on a response — just look at the address bar.
Next Steps: Moving Toward Automation
With both IDs documented, you’ve got the foundation for real Meraki API automation: cloning existing networks to spin up new sites instantly, copying configuration templates across branches, binding devices, or pushing firewall and VPN settings programmatically instead of clicking through the GUI one network at a time.
If you’re building out Python-based automation further, my guide on Python NETCONF Automation with ncclient is a good next stop for extending this same scripting approach to Cisco IOS-XE devices.
FAQ
Q: Do I need API access enabled to see the Organization ID in the dashboard footer?
A: No. The dashboard footer method (Step 4, Method C) works regardless of whether API access is enabled — it’s a UI element, not an API response. You only need API access enabled for the Postman and Python methods.
Q: My Network ID starts with “L_” instead of “N_” — is that a problem?
A: No. Meraki uses L_ prefixes for some legacy or specific network types (this shows up more often on older organizations). Functionally it works the same as an N_ prefixed ID in API calls.
Q: Can I have more than one Organization ID under the same login?
A: Yes. If your Meraki login has access to multiple organizations, the /organizations endpoint returns all of them as an array — you’ll need to identify the correct one by its name field before pulling networks under it.
Q: Is the Organization ID sensitive information I need to protect like the API key?
A: The Organization ID itself isn’t a secret — it’s just an identifier. Your API key is what needs password-manager-level protection, since that’s what actually authenticates requests.
Q: Why does my Postman request return a 404 on the networks endpoint?
A: This almost always means the Organization ID in your URL path is wrong or malformed — double-check you copied the full id string from the organizations response, not the name.
🔧 Free Network Tools
Handy while you're troubleshooting — no signup needed.