
INTRODUCTION
If you have spent any time writing network automation scripts using Python libraries like Paramiko or Netmiko, you are intimately familiar with the primary pain point of legacy automation: CLI screen scraping. Parsing text-based CLI outputs breaks instantly the moment a vendor updates an operating system, adds a new column to a table, or changes the spacing of a standard command.
To achieve robust, enterprise-grade network programmability, we must move away from unstructured text and embrace structured data models. Implementing python netconf cisco ios-xe automation solves this problem entirely. By utilizing standardized protocols and data formats, your scripts become resilient, scalable, and predictable.
In this comprehensive guide, you will learn exactly how to build a modern network automation environment from the ground up. By the end of this tutorial, you will master:
-
The core architecture and operations of the NETCONF protocol.
-
How to read and interpret YANG data models.
-
Enabling and verifying NETCONF services on Cisco IOS-XE devices.
-
Building programmatic SSH connections using the Python ncclient library.
-
Using
get-configto retrieve structured network data. -
Using
edit-configto push configuration changes programmatically.
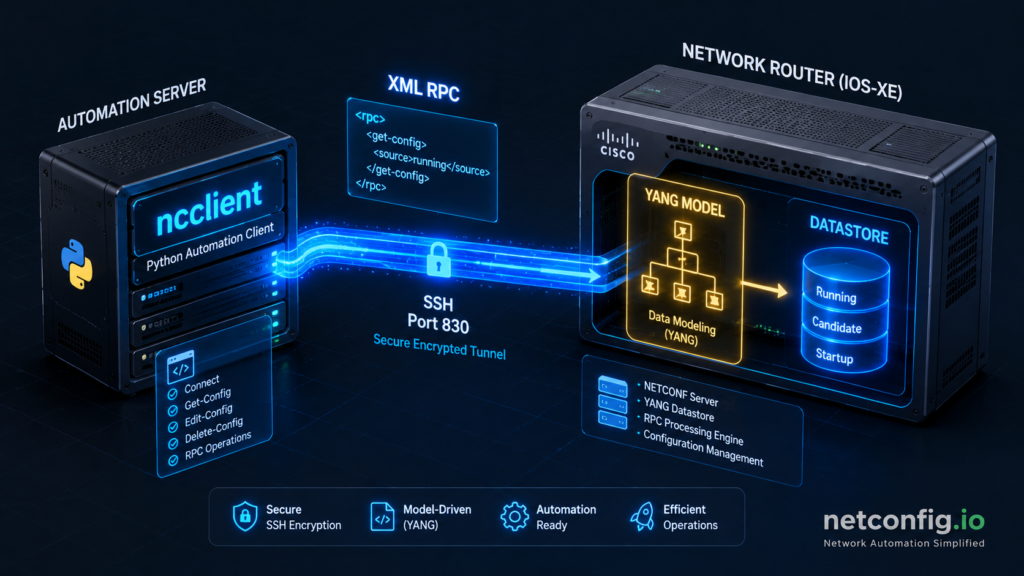
NETCONF (Network Configuration Protocol) is an IETF standard that provides mechanisms to install, manipulate, and delete the configuration of network devices. Unlike traditional CLI, it uses Remote Procedure Calls (RPCs) encoded in XML, ensuring that both the request sent to the device and the response received are machine-readable and highly structured.
This guide is explicitly designed for network engineers, NetOps professionals, and CCNP/CCIE candidates who want to transition from traditional CLI management to modern Python automation. Whether you are managing a fleet of hardware ISR routers or deploying CSR1000v/Catalyst 8000v instances in the cloud, these principles remain identical.
Already comfortable with the theory? Feel free to Jump to the Python Code to start executing scripts immediately.
WHAT IS NETCONF?
To fully grasp network automation python cisco strategies, you must understand the underlying mechanism of the protocol. Defined primarily in RFC 6241, NETCONF was created to address the shortcomings of SNMP and CLI. While SNMP is excellent for monitoring, it is notoriously poor for configuration management. CLI is excellent for humans, but terrible for software. NETCONF bridges this gap by acting as an API for your network infrastructure.
The NETCONF architecture is cleanly separated into four distinct conceptual layers. This modularity ensures that the data format is independent of the transport mechanism.
-
Content Layer: This is the actual data being sent or received. It consists of configuration data and state data, defined strictly by YANG models.
-
Operations Layer: Defines a set of base protocol operations (like retrieve, edit, copy, delete) invoked as RPC methods with XML-encoded parameters.
-
Messages Layer: Provides a simple, transport-independent framing mechanism for encoding RPCs and notifications. It uses
<rpc>,<rpc-reply>, and<rpc-error>elements. -
Transport Layer: The communication path between the client and server. NETCONF mandates a secure, connection-oriented transport. SSH is the universal standard.
To visualize this, consider the following ASCII topology diagram showing how a script communicates with a device:
Core NETCONF Operations
NETCONF provides a standardized set of operations. Below is a key NETCONF operations table mapping the programmatic API calls to their human-readable CLI equivalents:
Unlike traditional CLI scraping, a single NETCONF session allows you to execute an edit-config command, verify the XML <rpc-reply>, and confirm success programmatically without parsing regex strings.
Understanding Datastores
A critical concept in NETCONF is the “datastore”. A datastore is simply a conceptual place to store and access information.
-
Running Datastore: The complete, currently active configuration on the network device.
-
Startup Datastore: The configuration that will be loaded upon the next reboot.
-
Candidate Datastore: A workspace where you can safely construct and validate a configuration before committing it to the running datastore. (Note: Cisco IOS-XE relies primarily on running/startup, whereas IOS-XR heavily utilizes the candidate datastore).
YANG DATA MODELS EXPLAINED
You cannot effectively write a netconf python script without understanding the data structures it manipulates. YANG (Yet Another Next Generation) is a data modeling language defined in RFC 6020.
Think of NETCONF as the delivery truck and YANG as the blueprint of the cargo inside. YANG defines the exact hierarchy, data types, boundaries, and structure of the network configuration. It dictates whether an IP address should be a string, how many VLANs can be created, and the exact XML tags required to interface with the device.
Standard vs Vendor YANG Models
There are two primary categories of YANG models you will encounter when automating Cisco devices:
-
IETF Standard Models (OpenConfig / IETF): These models aim to be vendor-neutral. For example,
ietf-interfaces.yangdefines how an interface should look regardless of whether it is a Cisco, Juniper, or Arista device. This allows for truly vendor-agnostic automation scripts. -
Vendor-Native Models (Cisco-IOS-XE-native): Standard models rarely cover proprietary features (like EIGRP or specific hardware QoS). To expose every possible CLI command to NETCONF, Cisco provides native YANG models. The
Cisco-IOS-XE-native.yangmodel maps almost 1:1 with the traditional IOS-XE CLI hierarchy.
How to Find and Read YANG Models
Instead of guessing the XML structure, you can explore YANG models directly. Cisco publishes all of their YANG models on GitHub inside the YangModels/yang repository.
To read these files easily, network engineers use a command-line tool called pyang. It converts complex YANG text files into highly readable tree diagrams.
# Install the pyang tool via pip
pip install pyang

# Generate a visual tree structure of a downloaded YANG file
pyang -f tree Cisco-IOS-XE-native.yang | head -n 20
When you initiate a NETCONF session, the very first thing the router does is send a “Hello” message. This message contains the Server Capabilities. This capability list is literally a manifest of every single YANG model the device currently supports, complete with version numbers. This ensures the client and server agree on the data contract before exchanging configuration data.
ENVIRONMENT SETUP
Before writing our python netconf cisco ios-xe scripts, we must prepare both the network device and our local development environment. Missing these prerequisites is the number one reason beginners fail to connect to their lab devices.
Prerequisites
-
Python 3.6 or higher installed on your local machine (Python 3.10+ is highly recommended).
-
A physical Cisco IOS-XE device, or a virtualized instance (like CSR1000v/C8000v) running in CML, GNS3, or EVE-NG. Firmware should be 16.09 or later.
-
IP reachability to the device and TCP port 830 allowed through any transit firewalls.
-
An IDE like VS Code or PyCharm for script development.
Enabling NETCONF on Cisco IOS-XE
By default, NETCONF is disabled on Cisco devices for security reasons. You must explicitly enable the process and ensure SSH is configured correctly. Log into your device via console or traditional SSH and apply the following configuration:
Plaintext
! Enter global configuration mode
Router# configure terminal

! Enable the internal NETCONF/YANG processes
Router(config)# netconf-yang

! Specify that NETCONF should listen over SSH (Port 830)
Router(config)# netconf ssh

! Ensure AAA is configured for local authentication (if not already done)
Router(config)# aaa new-model
Router(config)# aaa authentication login default local
Router(config)# aaa authorization exec default local
To verify that the device is successfully listening for NETCONF connections, check the internal processes:
Plaintext
! Verify NETCONF processes are active
Router# show platform software yang-management process

! Expected output:
! confd            : Running
! nesd             : Running
! syncfd           : Running
! ncsshd           : Running   <-- This indicates NETCONF SSH is active
Python Environment Configuration
It is a strict industry best practice to isolate your python dependencies using a virtual environment. This prevents library version conflicts across different automation projects.
# Create a new virtual environment named 'netauto-env'
python3 -m venv netauto-env

# Activate the environment on Linux or macOS
source netauto-env/bin/activate

# (If you are using Windows, use this command instead)
# netauto-env\Scripts\activate

# Install the ncclient library and xmltodict for parsing
pip install ncclient xmltodict

# Verify the installation was successful
pip show ncclient
Confirm that the output shows ncclient is installed, alongside its core dependencies like paramiko (for SSH transport) and lxml (for rapid XML parsing).
STEP-BY-STEP PYTHON SCRIPTS
We are now ready to build our automation scripts. The code blocks below represent the core of the ncclient tutorial. We will progress from establishing a basic connection, to retrieving data, pushing a configuration, and finally building a robust, production-ready script.
Script 1: Connect & Fetch Server Capabilities
Our first script simply verifies that we can establish an SSH connection to port 830 and exchange NETCONF “Hello” messages. We will request the device’s Server Capabilities to view the YANG models it currently supports.
Python
# Import the manager module from ncclient
from ncclient import manager

# ─────────────────────────────────────────
# Device connection parameters
# WARNING: Use environment variables or
# a secrets vault in production — never
# hardcode credentials in scripts.
# ─────────────────────────────────────────
device_config = {
    'host': '192.168.1.100',          # Device management IP address
    'port': 830,                      # Standard NETCONF port
    'username': 'admin',              # Device credentials
    'password': 'Cisco123!',          # Device password
    'hostkey_verify': False,          # Disable SSH key verification for lab use
    'device_params': {'name': 'csr'}  # Crucial: Tells ncclient how to handle IOS-XE
}

def get_capabilities():
    """Connect to device and retrieve supported YANG capabilities."""
    print(f"[*] Connecting to {device_config['host']} via NETCONF...")

    # Establish connection using a context manager (with statement)
    # This ensures the session is cleanly closed automatically.
    with manager.connect(**device_config) as m:
        print("[+] Session established successfully\n")
        print("=" * 60)
        print("SERVER CAPABILITIES (YANG Models Supported)")
        print("=" * 60)

        # Iterate through the generator object containing the capabilities
        for cap in m.server_capabilities:
            print(cap)

        # Count and display the total number of supported models
        print(f"\n[+] Total capabilities: {len(list(m.server_capabilities))}")

if __name__ == "__main__":
    get_capabilities()
Expected Output (Truncated):
Plaintext
[*] Connecting to 192.168.1.100 via NETCONF...
[+] Session established successfully

============================================================
SERVER CAPABILITIES (YANG Models Supported)
============================================================
urn:ietf:params:netconf:base:1.0
urn:ietf:params:netconf:base:1.1
urn:ietf:params:netconf:capability:candidate:1.0
http://cisco.com/ns/yang/Cisco-IOS-XE-native?module=Cisco-IOS-XE-native&revision=2021-07-01
http://cisco.com/ns/yang/Cisco-IOS-XE-interfaces?module=Cisco-IOS-XE-interfaces&revision=2021-03-01
...
[+] Total capabilities: 342
Note on device_params: Passing {'name': 'csr'} instructs ncclient to use the Cisco IOS-XE specific SSH handler. Other valid handlers include nexus, iosxr, and junos.
Script 2: Retrieve Running Configuration (get-config)
Pulling the entire running configuration as a massive XML blob is inefficient. Instead, we use XML filters to retrieve precisely what we need. This script uses a filter to grab the configuration of just one interface.
Python
from ncclient import manager
import xmltodict
import json

# Device parameters identical to Script 1
device_config = {
    'host': '192.168.1.100',
    'port': 830,
    'username': 'admin',
    'password': 'Cisco123!',
    'hostkey_verify': False,
    'device_params': {'name': 'csr'}
}

# Filter: retrieve only GigabitEthernet1 config
# The xmlns defines the Cisco native YANG namespace
interface_filter = """
<filter>
  <native xmlns="http://cisco.com/ns/yang/Cisco-IOS-XE-native">
    <interface>
      <GigabitEthernet>
        <name>1</name>
      </GigabitEthernet>
    </interface>
  </native>
</filter>
"""

def get_interface_config():
    with manager.connect(**device_config) as m:
        # Use get_config, specifying the source datastore and the XML filter
        response = m.get_config(source='running', filter=interface_filter)

        # The response is an RPCReply object. The actual XML payload is in response.xml.
        # Parse this raw XML into a Python dictionary for easier handling.
        config_dict = xmltodict.parse(response.xml)

        # Pretty print the dictionary as JSON to the console
        print(json.dumps(config_dict, indent=2))

if __name__ == "__main__":
    get_interface_config()
Expected Output:
JSON
{
  "rpc-reply": {
    "@xmlns": "urn:ietf:params:xml:ns:netconf:base:1.0",
    "@message-id": "urn:uuid:12345678-abcd-1234",
    "data": {
      "native": {
        "@xmlns": "http://cisco.com/ns/yang/Cisco-IOS-XE-native",
        "interface": {
          "GigabitEthernet": {
            "name": "1",
            "description": "WAN_Uplink",
            "ip": {
              "address": {
                "primary": {
                  "address": "10.0.0.5",
                  "mask": "255.255.255.0"
                }
              }
            },
            "mop": {
              "enabled": "false"
            },
            "negotiation": {
              "auto": "true"
            }
          }
        }
      }
    }
  }
}
Script 3: Push Configuration (edit-config)
Now we will mutate the device state using an edit-config operation. We will construct an XML payload to create a brand new Loopback interface.
Notice the nc:operation="merge" attribute. This tells the device to merge this configuration with the existing running config. Other valid operations include replace and delete.
Python
from ncclient import manager

device_config = {
    'host': '192.168.1.100',
    'port': 830,
    'username': 'admin',
    'password': 'Cisco123!',
    'hostkey_verify': False,
    'device_params': {'name': 'csr'}
}

# XML payload to create Loopback99 with description and IP
config_payload = """
<config>
  <native xmlns="http://cisco.com/ns/yang/Cisco-IOS-XE-native">
    <interface>
      <Loopback>
        <name>99</name>
        <description>Managed by NETCONF Python Script</description>
        <ip>
          <address>
            <primary>
              <address>10.99.99.1</address>
              <mask>255.255.255.255</mask>
            </primary>
          </address>
        </ip>
      </Loopback>
    </interface>
  </native>
</config>
"""

def create_loopback():
    with manager.connect(**device_config) as m:
        # Push the XML payload to the running datastore
        response = m.edit_config(target='running', config=config_payload)

        print(f"[+] Raw RPC Reply: {response}")

        # Verify success by checking if the standard '<ok/>' tag is in the response
        if '<ok/>' in str(response):
            print("\n[+] Configuration applied successfully!")
        else:
            print("\n[-] Configuration failed. Check device logs.")

if __name__ == "__main__":
    create_loopback()
If you log into the router CLI immediately after running this script and execute show run interface Loopback99, you will see the new interface perfectly configured.
Script 4: Production-Grade Template (With Error Handling)
Hardcoding credentials and ignoring timeouts is fine for a lab, but catastrophic in production. This final script demonstrates how a get-config netconf python script should look in a real enterprise environment. It utilizes environment variables, implements specific try/except blocks, and logs activity to a file.
Python
import os
import logging
from ncclient import manager
from ncclient.transport.errors import AuthenticationError, SSHError
from ncclient.operations.errors import TimeoutExpiredError
import xmltodict
import json

# Configure logging to write outputs to a local file
logging.basicConfig(
    filename='netconf_automation.log',
    level=logging.INFO,
    format='%(asctime)s - %(levelname)s - %(message)s'
)

# Pull sensitive data securely from system environment variables
device_config = {
    'host': os.environ.get('DEVICE_HOST', '192.168.1.100'),
    'port': int(os.environ.get('DEVICE_PORT', 830)),
    'username': os.environ.get('DEVICE_USER'),
    'password': os.environ.get('DEVICE_PASS'),
    'hostkey_verify': False,  # Should be True in production with proper SSH keys
    'device_params': {'name': 'csr'},
    'manager_params': {'timeout': 60}  # Increase global RPC timeout
}

def connect_and_get_config(filter_xml=None):
    try:
        logging.info(f"Attempting NETCONF connection to {device_config['host']}")

        with manager.connect(**device_config) as m:
            logging.info("NETCONF session established successfully")

            # Conditionally apply filter if one is provided
            if filter_xml:
                result = m.get_config(source='running', filter=filter_xml)
            else:
                result = m.get_config(source='running')

            logging.info("Configuration retrieved successfully")
            return xmltodict.parse(result.xml)

    except AuthenticationError:
        logging.error("Authentication failed — check user credentials")
        raise
    except SSHError as e:
        logging.error(f"SSH transport error occurred: {e}")
        raise
    except TimeoutExpiredError:
        logging.error("Connection timed out — check if NETCONF is enabled on the device")
        raise
    except Exception as general_error:
        logging.error(f"An unexpected error occurred: {general_error}")
        raise

if __name__ == "__main__":
    # Ensure environment variables are actually set before running
    if not os.environ.get('DEVICE_USER'):
        print("Error: DEVICE_USER environment variable is not set.")
        exit(1)

    config = connect_and_get_config()
    print(json.dumps(config, indent=2)[:500]) # Print first 500 characters to verify
TROUBLESHOOTING
When implementing cisco netconf configuration automation, things will inevitably break. Here are the most common errors engineers face and how to fix them immediately.
Problem: Connection refused on port 830
Cause: The script cannot reach the NETCONF port on the router. Either a firewall is blocking TCP 830, or the netconf-yang process is not enabled on the IOS-XE device.
Fix: Log into the router CLI. Run show platform software yang-management process. If ncsshd is down, enter global config mode and type netconf-yang. Also verify your access-control lists (ACLs) permit port 830 on the management interface.
Problem: Authentication failure
Cause: The username and password provided in your Python script are incorrect, or the user account lacks the privilege level required to access the device subsystem.
Fix: Verify credentials via standard SSH first. Ensure the account in the device configuration has privilege 15 assigned. Example: username admin privilege 15 secret Cisco123!.
Problem: XML namespace errors in filter
Cause: Your XML filter or payload is missing the correct xmlns (XML namespace) attribute. The NETCONF agent receives the request, but rejects it because it doesn’t know which YANG model you are trying to reference.
Fix: Always include the namespace in the root element of your filter. For Cisco native commands, use <native xmlns="http://cisco.com/ns/yang/Cisco-IOS-XE-native">.
Problem: hostkey_verify error in production
Cause: By default, ncclient attempts to verify the RSA/ECDSA host key of the router against your local ~/.ssh/known_hosts file. If the key is unknown, it throws an exception.
Fix: In lab environments, set 'hostkey_verify': False in your device_config dictionary. In production, ensure you SSH into the device manually once to add the key to your known_hosts file, and set the value to True.
Problem: Device returns empty config for valid filter
Cause: You sent a perfectly formatted XML filter, but the resulting <rpc-reply> contains no data. This usually happens because the data you requested does not exist in the datastore, or there is a typo in your XML tag casing (XML is strictly case-sensitive).
Fix: Verify the configuration exists via CLI first. Double-check your XML casing (e.g., GigabitEthernet must be exact, gigabitethernet will return empty).
Problem: ncclient import error after pip install
Cause: You installed the library globally, but your IDE or terminal is running a script inside an isolated virtual environment (or vice versa).
Fix: Ensure your virtual environment is activated (source netauto-env/bin/activate). Run which python or python -m pip freeze to verify you are executing Python from the environment where ncclient was installed.
Problem: Timeout on edit-config for large configs
Cause: The configuration you are pushing is massive, and the router needs more time to process the transaction and generate the RPC reply than the default timeout allows.
Fix: Increase the timeout window globally in your connection parameters by adding 'manager_params': {'timeout': 120} to your connection dictionary.
NETCONF vs ALTERNATIVES
To choose the right automation strategy, you must understand how NETCONF stacks up against legacy protocols and newer API standards.
Why choose NETCONF over RESTCONF? While RESTCONF is excellent for integrating with modern web dashboards because of its JSON support, NETCONF remains the king of infrastructure operations. NETCONF is highly transactional. It natively supports exclusive datastore locks—meaning you can lock the router’s configuration, preventing another engineer from making changes via CLI while your script is running. Furthermore, NETCONF’s support for the <candidate> datastore makes complex, multi-device rollbacks far safer than RESTful methods. If you are configuring infrastructure, use NETCONF. If you are polling data for a web app, use RESTCONF.
BEST PRACTICES
Following yang data models python best practices ensures your scripts are secure, maintainable, and resilient at scale.
-
Never hardcode credentials. Storing passwords in plaintext inside Python scripts is a massive security risk. Always use
os.environto pull credentials from environment variables, or integrate with a secrets manager like HashiCorp Vault. -
Always use
withstatements. Using thewith manager.connect(...) as m:context manager ensures that the NETCONF SSH session is elegantly torn down and closed, even if your script crashes halfway through execution. -
Test with get-config first. Before attempting an
edit-configoperation, run aget-configto view the exact XML structure the device expects. This prevents syntax errors during pushes. -
Use Jinja2 for XML payloads. Do not use inline, hardcoded multi-line strings for large configuration pushes. Store your XML payloads in external
.j2template files and render them dynamically using the Python Jinja2 library. -
Validate YANG models with pyang. Do not guess XML tags. Download the exact YANG models for your IOS-XE firmware version and inspect the tree structure using
pyangbefore writing code. -
Utilize candidate datastores. While IOS-XE heavily relies on the running datastore, platforms like IOS-XR support the candidate datastore. Always edit the candidate datastore and issue a formal
<commit>RPC to apply atomic changes safely. -
Enable NETCONF logging on the device. Turn on
debug netconf allor configure syslog to track NETCONF sessions. This provides a critical audit trail showing exactly when a script altered the infrastructure. -
Pin your dependency versions. Always create a
requirements.txtfile and pin your library versions (e.g.,ncclient==0.6.15). This prevents unexpected script failures if a future library update introduces breaking changes. -
Implement retry logic. Network latency happens. Wrap your connection attempts in a Python
whileloop or use thetenacitylibrary to automatically retry failed connections before crashing the script. -
Use xmltodict for parsing. XML is notoriously difficult to navigate natively in Python. Using
xmltodict.parse()instantly converts the complex XML<rpc-reply>into a native Python dictionary, making data extraction trivial.
FAQ
Q1: What is ncclient used for in Python? The ncclient library is a Python library specifically designed to act as a NETCONF client. It handles the complexities of SSH transport, XML framing, and RPC message formatting required to communicate with network devices using the NETCONF protocol. Network engineers use it to automate configuration management, retrieve operational state data, and push changes to devices like Cisco routers and switches without relying on fragile CLI screen scraping.
Q2: How do I enable NETCONF on Cisco IOS-XE? To enable NETCONF on a Cisco IOS-XE device, access the global configuration mode via SSH or console. Type the command netconf-yang and press enter. This starts the internal confd processes and the NETCONF SSH listener. You can verify it is running by executing show platform software yang-management process in privilege exec mode. Ensure that the ncsshd process shows a status of “Running”.
Q3: What port does NETCONF use? By default, NETCONF uses TCP port 830. This port is officially assigned by IANA for NETCONF over SSH. When a NETCONF client attempts to connect to a network device, it initiates an SSH subsystem connection directed specifically at port 830, rather than the standard SSH port 22. Some vendors allow you to configure NETCONF to run over standard port 22, but port 830 remains the industry standard.
Q4: What is the difference between NETCONF and RESTCONF? NETCONF operates over SSH (port 830) using XML for both data encoding and remote procedure calls (RPC). It supports atomic transactions, configuration rollbacks, and datastore locking, making it ideal for robust infrastructure management. RESTCONF operates over HTTPS (port 443) and utilizes standard HTTP methods (GET, POST, PUT, DELETE). It supports both JSON and XML data formats. RESTCONF is typically preferred for web application integration, while NETCONF is better for heavy-duty, transactional network configuration.
Q5: How do I install ncclient in Python? You can install ncclient using Python’s built-in package manager, pip. Open your terminal or command prompt, ensure your virtual environment is activated, and type pip install ncclient. It is highly recommended to also install xmltodict (pip install xmltodict) alongside it. The xmltodict library makes it significantly easier to parse the complex XML responses returned by the network device into readable Python dictionaries.
Q6: What are NETCONF server capabilities? NETCONF server capabilities act as an advertisement manifest during the initial connection handshake. When a client connects to a device, the device sends a list of every YANG data model and NETCONF feature it supports. These capabilities tell the client exactly what configuration structures, operational data, and protocol operations (like candidate datastores or confirmed commits) the device understands, ensuring the client formats its requests correctly.
Q7: Can ncclient work with non-Cisco devices? Yes, ncclient is entirely vendor-agnostic. Because NETCONF is an IETF standard protocol (RFC 6241), ncclient can manage any device that supports NETCONF. This includes Juniper (Junos), Arista (EOS), Nokia (SR OS), and Palo Alto firewalls. When connecting to different vendors, you simply adjust the device_params argument in your connection script (e.g., using 'name': 'junos' or 'name': 'nexus') so ncclient knows how to handle vendor-specific SSH quirks.
Q8: What is get-config in NETCONF? The get-config operation is a standard NETCONF protocol method used to retrieve all or part of a specified configuration datastore (usually the ‘running’ or ‘startup’ datastore). Unlike the standard get operation—which returns both configuration and operational state data (like interface counters)—get-config returns strictly configuration data. It is the programmatic equivalent of running the show running-config command on the command-line interface.
EXTERNAL LINKS
RFC 6241 – NETCONF Configuration Protocol – https://datatracker.ietf.org/doc/html/rfc6241
GitHub: YangModels/yang Repository – https://github.com/YangModels/yang
NCclient Official PyPI Documentation – https://pypi.org/project/ncclient/
Cisco DevNet: Introduction to NETCONF and YANG – https://developer.cisco.com/learning/modules/intro-netconf-yang/
CONCLUSION
Mastering python netconf cisco ios-xe configurations represents a significant paradigm shift in how we manage infrastructure. By transitioning away from the fragile, unstructured text scraping of the past and adopting the structured, API-driven methodologies of NETCONF and YANG, you drastically reduce the risk of human error in your network operations.
Throughout this guide, we explored the underlying mechanics of the protocol, visualized YANG models, enabled the necessary services on IOS-XE, and built robust ncclient scripts capable of both retrieving and editing device states safely. We also implemented critical error-handling frameworks to ensure these scripts survive the unpredictable reality of production networks.
Your natural next steps involve scaling these concepts. Begin exploring how to store your XML payloads externally using Jinja2 templates. Investigate how Ansible’s netconf_config module abstracts much of this Python code behind YAML playbooks, or how the Nornir framework can run these exact ncclient scripts concurrently across thousands of devices in seconds.
Automation is an iterative journey. Do not attempt to rewrite your entire network management strategy overnight. Start small: use get-config to back up your router configurations daily, then graduate to creating automated loopbacks or updating ACLs via edit-config.
Have questions about this setup, or run into an obscure XML parsing error while running these scripts in your lab? Drop them in the comments below, and our engineering community will help you out.
Don’t miss our next deep dive into network automation—subscribe to the netconfig.io newsletter today to get advanced Python and NetOps tutorials delivered straight to your inbox.
Bhardwaj Vishnu is an L2 Network Security Engineer with hands-on expertise in enterprise firewall management, network automation, and multi-vendor infrastructure. He holds Fortinet NSE 4 and NSE 5 certifications, a Cisco CCNA, and has completed all three stages of the Cisco Meraki certification track. In his day-to-day role, he architects and maintains security policies on FortiGate firewalls, deploys and manages Cisco Meraki MX, MS, and MR environments, and handles Cisco routing and switching at scale. Every technical guide on NetConfig.io is written from direct production experience — real CLI commands, verified configurations, and the hard-won lessons that vendor documentation never covers.